Archive for ‘Uncategorized’

March 18, 2014

Buttons

Buttons

Screen Shot 2013-02-01 at 09.18.3017th century buttons were not pierced with two or four holes like those generally used now. Instead they had a shank on the back of the button, and the single attachment hole passed through that.

The picture shows a typical 17th century pewter button on the portable antiquities site. Metal buttons were common, often made from lead, pewter tin or alloys of the same. These were usually cast, and the shank could be formed as one piece with the button, or could be in the form of a twist of copper alloy or iron wire set into the casting. Metal buttons could also be made from copper alloy, either cast as here, or in the case of flat buttons, punched from sheet with a loop soldered on the back.  Buttons could also be made from wood, bone etc, but these styles were also shanked not pierced. Upper class buttons could be in silver, gold, or precious stones.

Screen Shot 2013-02-01 at 08.56.08

Screen Shot 2013-02-01 at 09.01.15

Another style of button used a core, often of wood, covered in a wrapping of threads. The threads also formed an attachment shank. They could be fairly plain and simple, or use expensive silk or silver and gold thread. The plain example on the left is attached to a possibly 17th century coat in Colchester Museum, and is wrapped in linen thread. The right hand example from the Museum of London, a doublet from the Isham Collection. This is silk and metallic thread wrapped.

Cloth Buttons

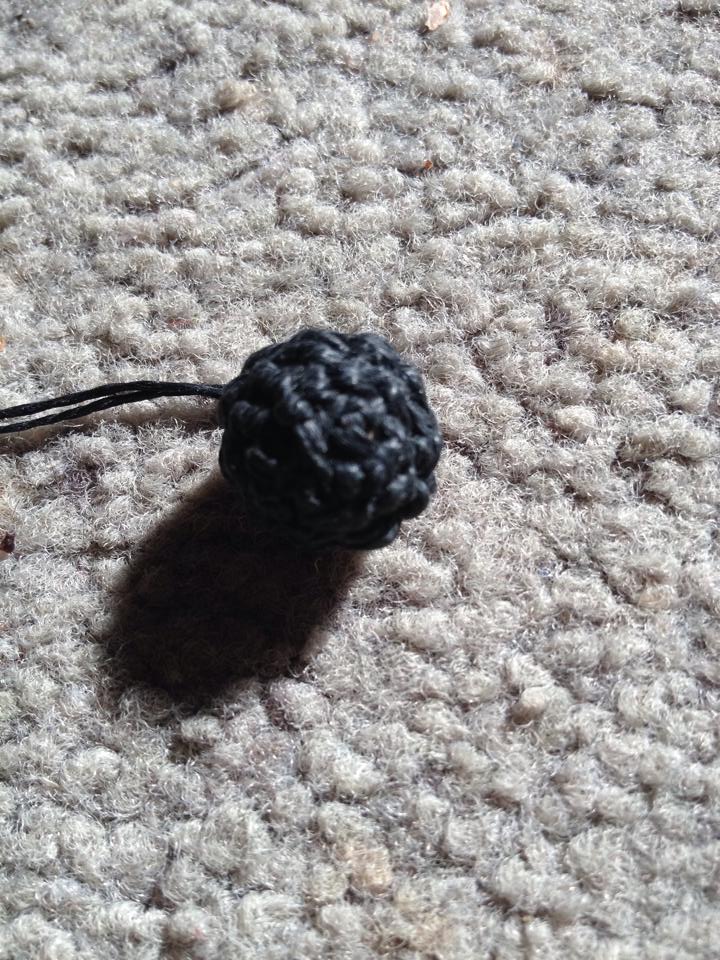
Cloth buttons were also common: formed from scraps of cloth, or a wooden core, wrapped in a piece of cloth, these also had a shank formed by binding and stitching. None have survived as far as I know, but here is a row of buttons on a reconstructed soldier’s coat.

Here’s a link to a nice piece about how to make your own thread wrapped and cloth buttons and another here

Two more original examples of thread wrapped buttons. The left hand button a detail from a boys doublet in Abingdon Museum. This button has been wrapped in a chevron pattern. The right hand picture is of an embroidered linen doublet in the Manchester Costume Collection in Platt Hall. The wrapping here starts with 5 or 6 guide threads around which the rest of the thread is anchored. Notice on both buttons that there is a centre knot. This is the top end of the anchoring threads that pass through the fabric of the doublet and form the shank holding the button up.

Screen Shot 2013-02-01 at 09.14.38Screen Shot 2013-02-01 at 09.03.09

These buttons on a doublet in a museum in London have lost some of their top threads, showing how they were made, satin wrapped threads around the bead and embroidered over the top.

DSC_1472

Have a look at this portrait of Nicholas Lanier. The knots on the top of his buttons can be seen clearly.

And here are some more examples of nice reproduction buttons.

Screen Shot 2013-02-01 at 08.58.20

Silk wrapped ones for a rather garish costume at Shakespeare’s Globe by Karl Robinson

10676400_10203103062953043_8274216368324318834_n

Linen thread wrapped one by the 1642 Tailor

Metal buttons

Reproduction pewter buttons on a soldier’s coat from Christophu

Screen Shot 2013-02-02 at 09.27.59

And last, but by no means least, some chevron wrapped ones by Gina Barrett

March 12, 2014

Ladies’ Coif

I set our goodwife the task of making a coif for display. She chose one from Janet Arnold’s Patterns of Fashion, number fifty one in the book, dated 1600-10, but still ok for 1640s we reckon. The original is in the Museum of Costume and Textiles in Nottingham and features strings that run through embroidered loops so the coif can be adjusted to suit a variety of hairstyles (according to Janet Arnold)

Here is the result. The original is embroidered, though that would be a bit old fashioned for the civil war period and 999950_627507820652990_401847792_n 1924624_627507843986321_956204083_n trimmed with a narrow needle lace. We chose Tudor Tailor lace and a plain linen. Barbara sewed every stitch by hand and made the loops & strings


It lookedIMG_20140312_145137 a bit odd on the stand, perhaps a bit too baggy at the back, but we found when the needle woman tried it on that it does fit and the adjusting strings do provide the necessary adjustment as the book suggested. There are other ways of wearing a coif, braided hair will provide an anchoring point to tie the strings round for example, though this style seems to work well without. For further info, check the link to ECW Resources page

March 10, 2014

A Drummer’s Montero

Just a few pics of a work in progress from a week or so ago.I may give away some of my secrets here, so don’t spread them around please!


The brief was a red montero with a pointed front skirt and 1794522_615542231849549_1374306424_ngold braid. The braid comes from Morocco and is just gold wire braided into a cord, more 1640s than all the russia braid that you see in the haberdashery stores which was an 18th century adornment. Here’s a photo of the newly finished and decorated crown.


The next stage of making the hat is to sew together the crown, lining and peak together using the linen strip that will become the internal band of the hat. I have no idea whether 1640s caps had this internal band, but I’ve found it adds to the comfort of the hat and finishes the bottom edge off in a neat though still properly period manner. Here’s the seam half-way 993027_616460385091067_150874468_nfinished. It all looks a bit scruffy really, but all the internal workings disappear when the cap is finished.


One this seam is done, all the excess fabric is cut away, leaving as small a seam allowance as I dare. The next photo 1620527_616479178422521_1451552875_nshows the crown and peak finished, just waiting for the skirt to be fixed on. From this stage, all that needs doing is the skirt to be sewn to the outside of the crown, maintaining a half inch or so between the bottom edge of the crown and the skirt and then whipping down the internal band to hide all the scruffy inside seams. Voila!


1962693_617730188297420_314582442_n


March 6, 2014

Sewing the Doublet

Actually, like a fool I forgot to take too many photos whilst I made up the doublet. I did lay out the tabs before I put1939902_619718428098596_268017672_n them around the waistline. The fabric is quite fine, so I layered the tabs with a piece of broadcloth inside each one, wrapping the outer black wool around the inner and then whipping the linen lining to the inside.

The next picture is a close up of the finishing off under the girdle stead that neatens the edge between the body 1779731_620663798004059_2145840138_nlining and the tabs. It all gets covered up by the girdle stead strip. This is where the eyes will be sewn when the thing is finished

Here are two pictures of the (nearly) finished doublet showing the inside and outside views. I need to finish four buttonholes and the doublet is done.

1922249_623844901019282_1505510927_n 1797479_623869144350191_1667274543_n

January 23, 2013

What To Wear In The English Civil War

Introduction

read more »