Recently I was allowed access to the foot colour in the National Army Museum store in Stevenage. It was educational and as you will see I was inspired to have go and make one from scratch which opened up some of the secrets of the 1640s tailors who were asked to make flags for the armies of the Civil War.
4th Captain’s Colour Sir John Gell’s Regiment of Foot c1646
This is the catalogue entry from the museum website about Gell:
Sir John Gell was High Sheriff of Derbyshire when he was commissioned as Colonel to raise a Parliamentarian regiment during the English Civil War (1642-1651). His regiment took part in several engagements including the sieges of Chester and Lichfield and the battle of Hopton Heath.
Gell became disaffected with the political direction taken by the Parliamentary regime after the king’s surrender in 1646. A further cause of disillusionment was Parliament’s reluctance to compensate him for losses he incurred in fighting the war. In 1646 his regiment was disbanded and he was relieved of all appointments. Gell moved to London where he made contact with Royalist agents but in 1650 he was found guilty of knowing of a royalist plot and not revealing it to the authorities. Imprisoned in the Tower of London, Gell was released in 1653 on grounds of ill health. He was pardoned by King Charles II at the Restoration in 1660 and given an appointment at court.
This foot colour is the best provenanced of the three in the museum, having been in the keeping of the descendants of Sir John Gell in Newnham in Northamptonshire it can be connected with some certainty to Gell’s regiment from the Civil War. It was framed and kept behind glass where Andrew Polkey examined it for his research into the war in Derbyshire and Stephen Ede Borrett for his book ‘Ensignes of the Civil Wars’. Andrew’s comments formed the larger part of a description in ECW Flags and Colours by Les Prince and Stuart Peachey. In 1994 it was purchased by the National Army Museum and passed into their collection. Recently it was taken for conservation work to the Museum’s workshops in Woolwich. It has now been returned to the stores in Stevenage where I was allowed to view and photograph it. I had read the piece in Les’ and Stephen’s books, but because the previous inspections upon which the descriptions were based were limited I wanted to look at it for myself.
The museum entry says:
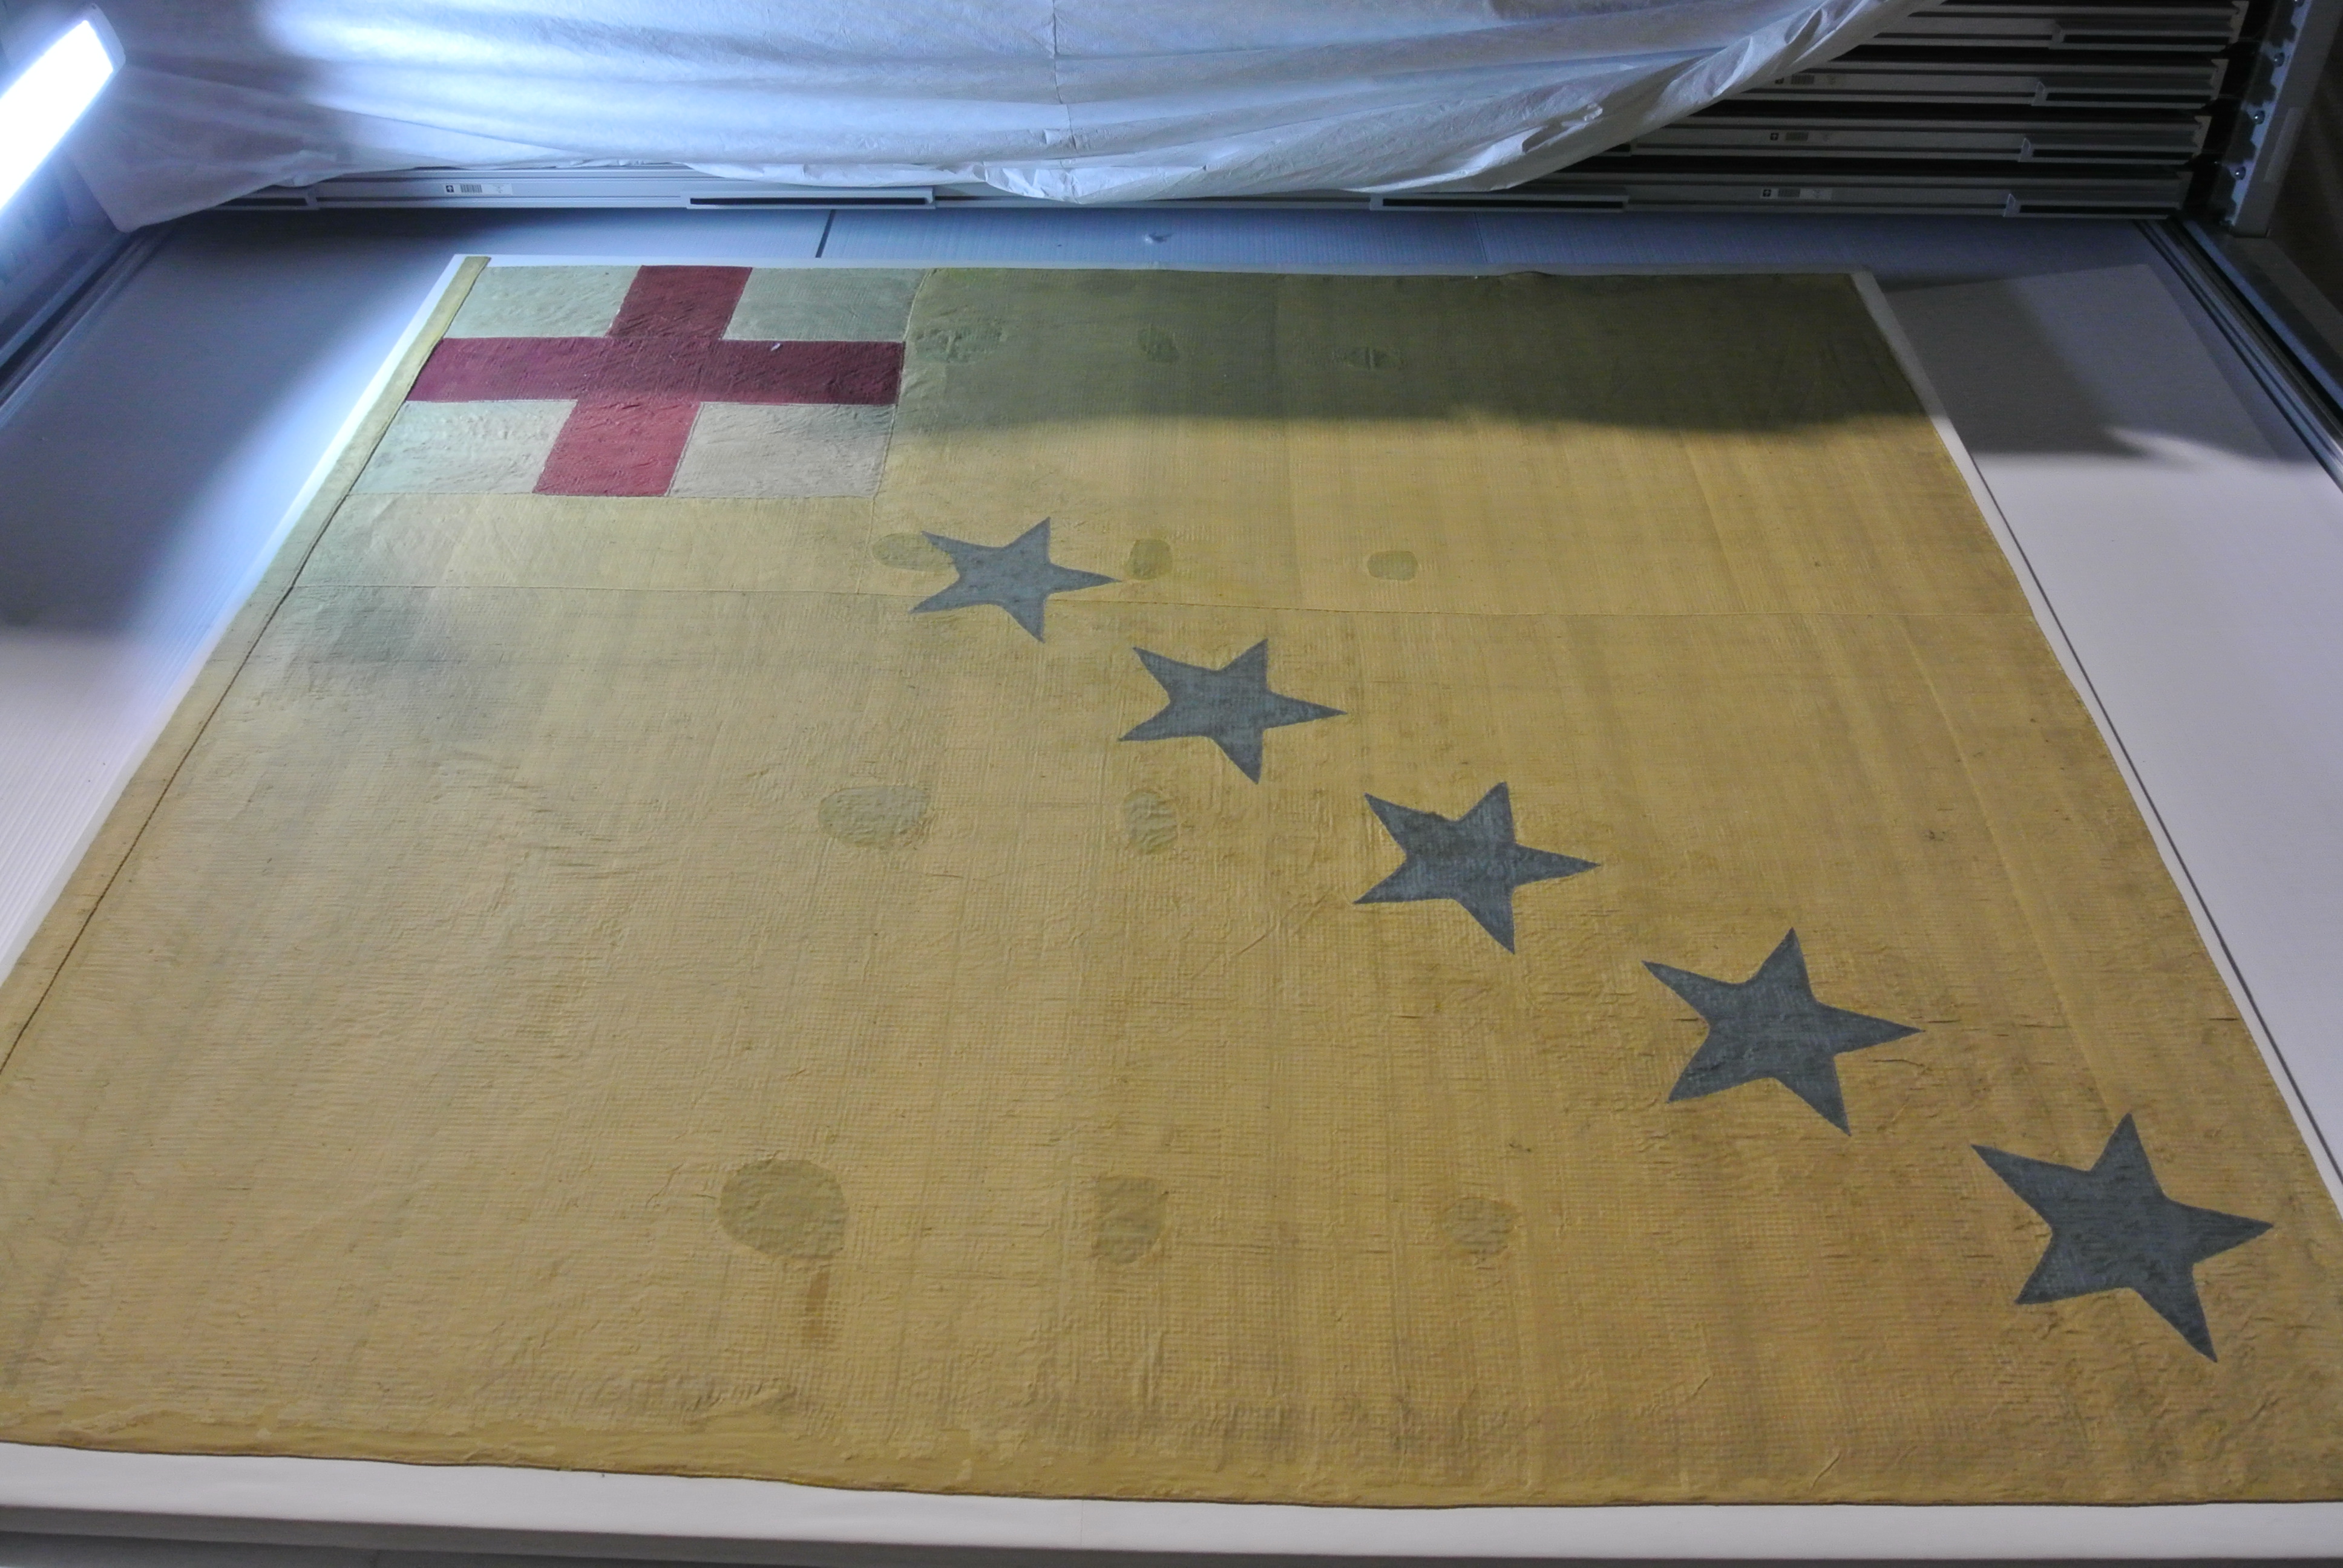
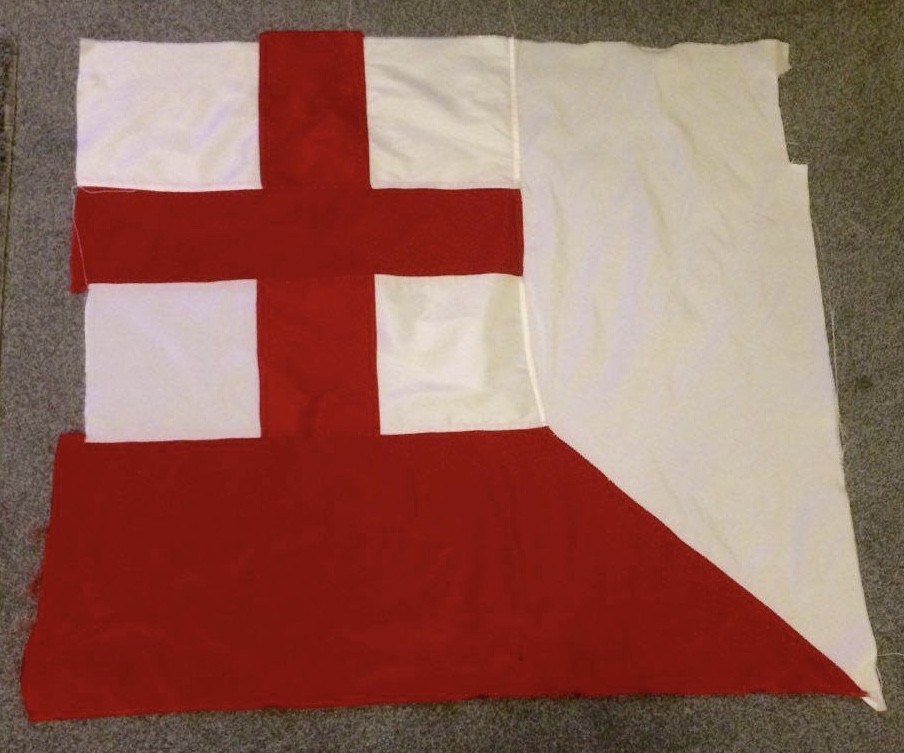
“4TH Captain’s colour. Gell’s Regiment of Infantry, C.1650. Double sided silk colour with a gold silk ground and five blue stars inset, running diagonally from the lower right corner of St. George’s Cross at the top left to the lower right corner (as viewed). The pole sleeve is lined with linen fabric.”
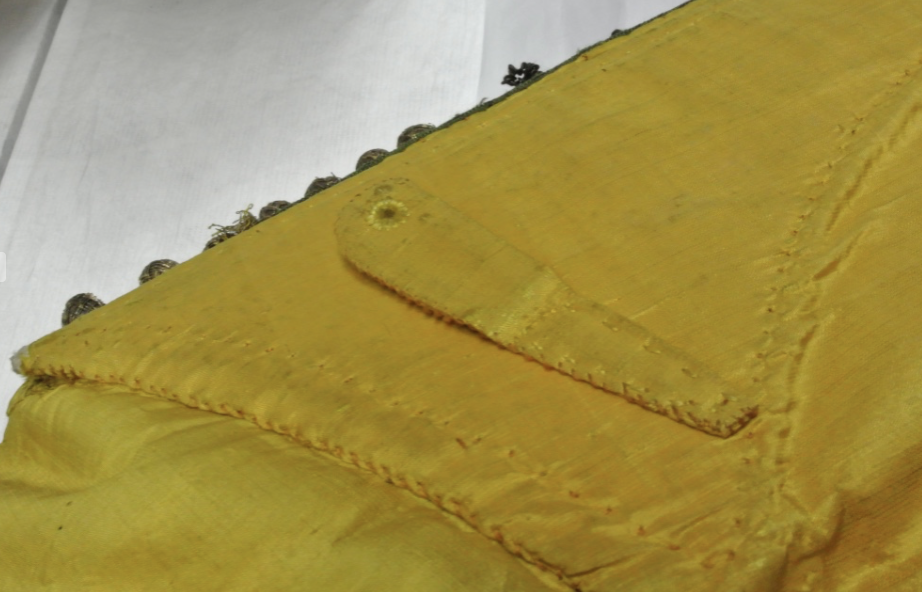
The width of the colour is 1990mm. It is 1915mm tall at the pole sleeve and 1870mm at the fly. The body of the flag is cut from three sections of yellow silk hand-stitched together with run and fell seams. The upper portion above the horizontal seam is 800mm wide and the lower section 1050mm. The lower section is one single piece whilst the upper section is made in two pieces of yellow silk, one under the canton and the larger piece (to the right hand side in the photo) joined with a vertical seam that runs from the top right hand corner of the canton to the centre seam.
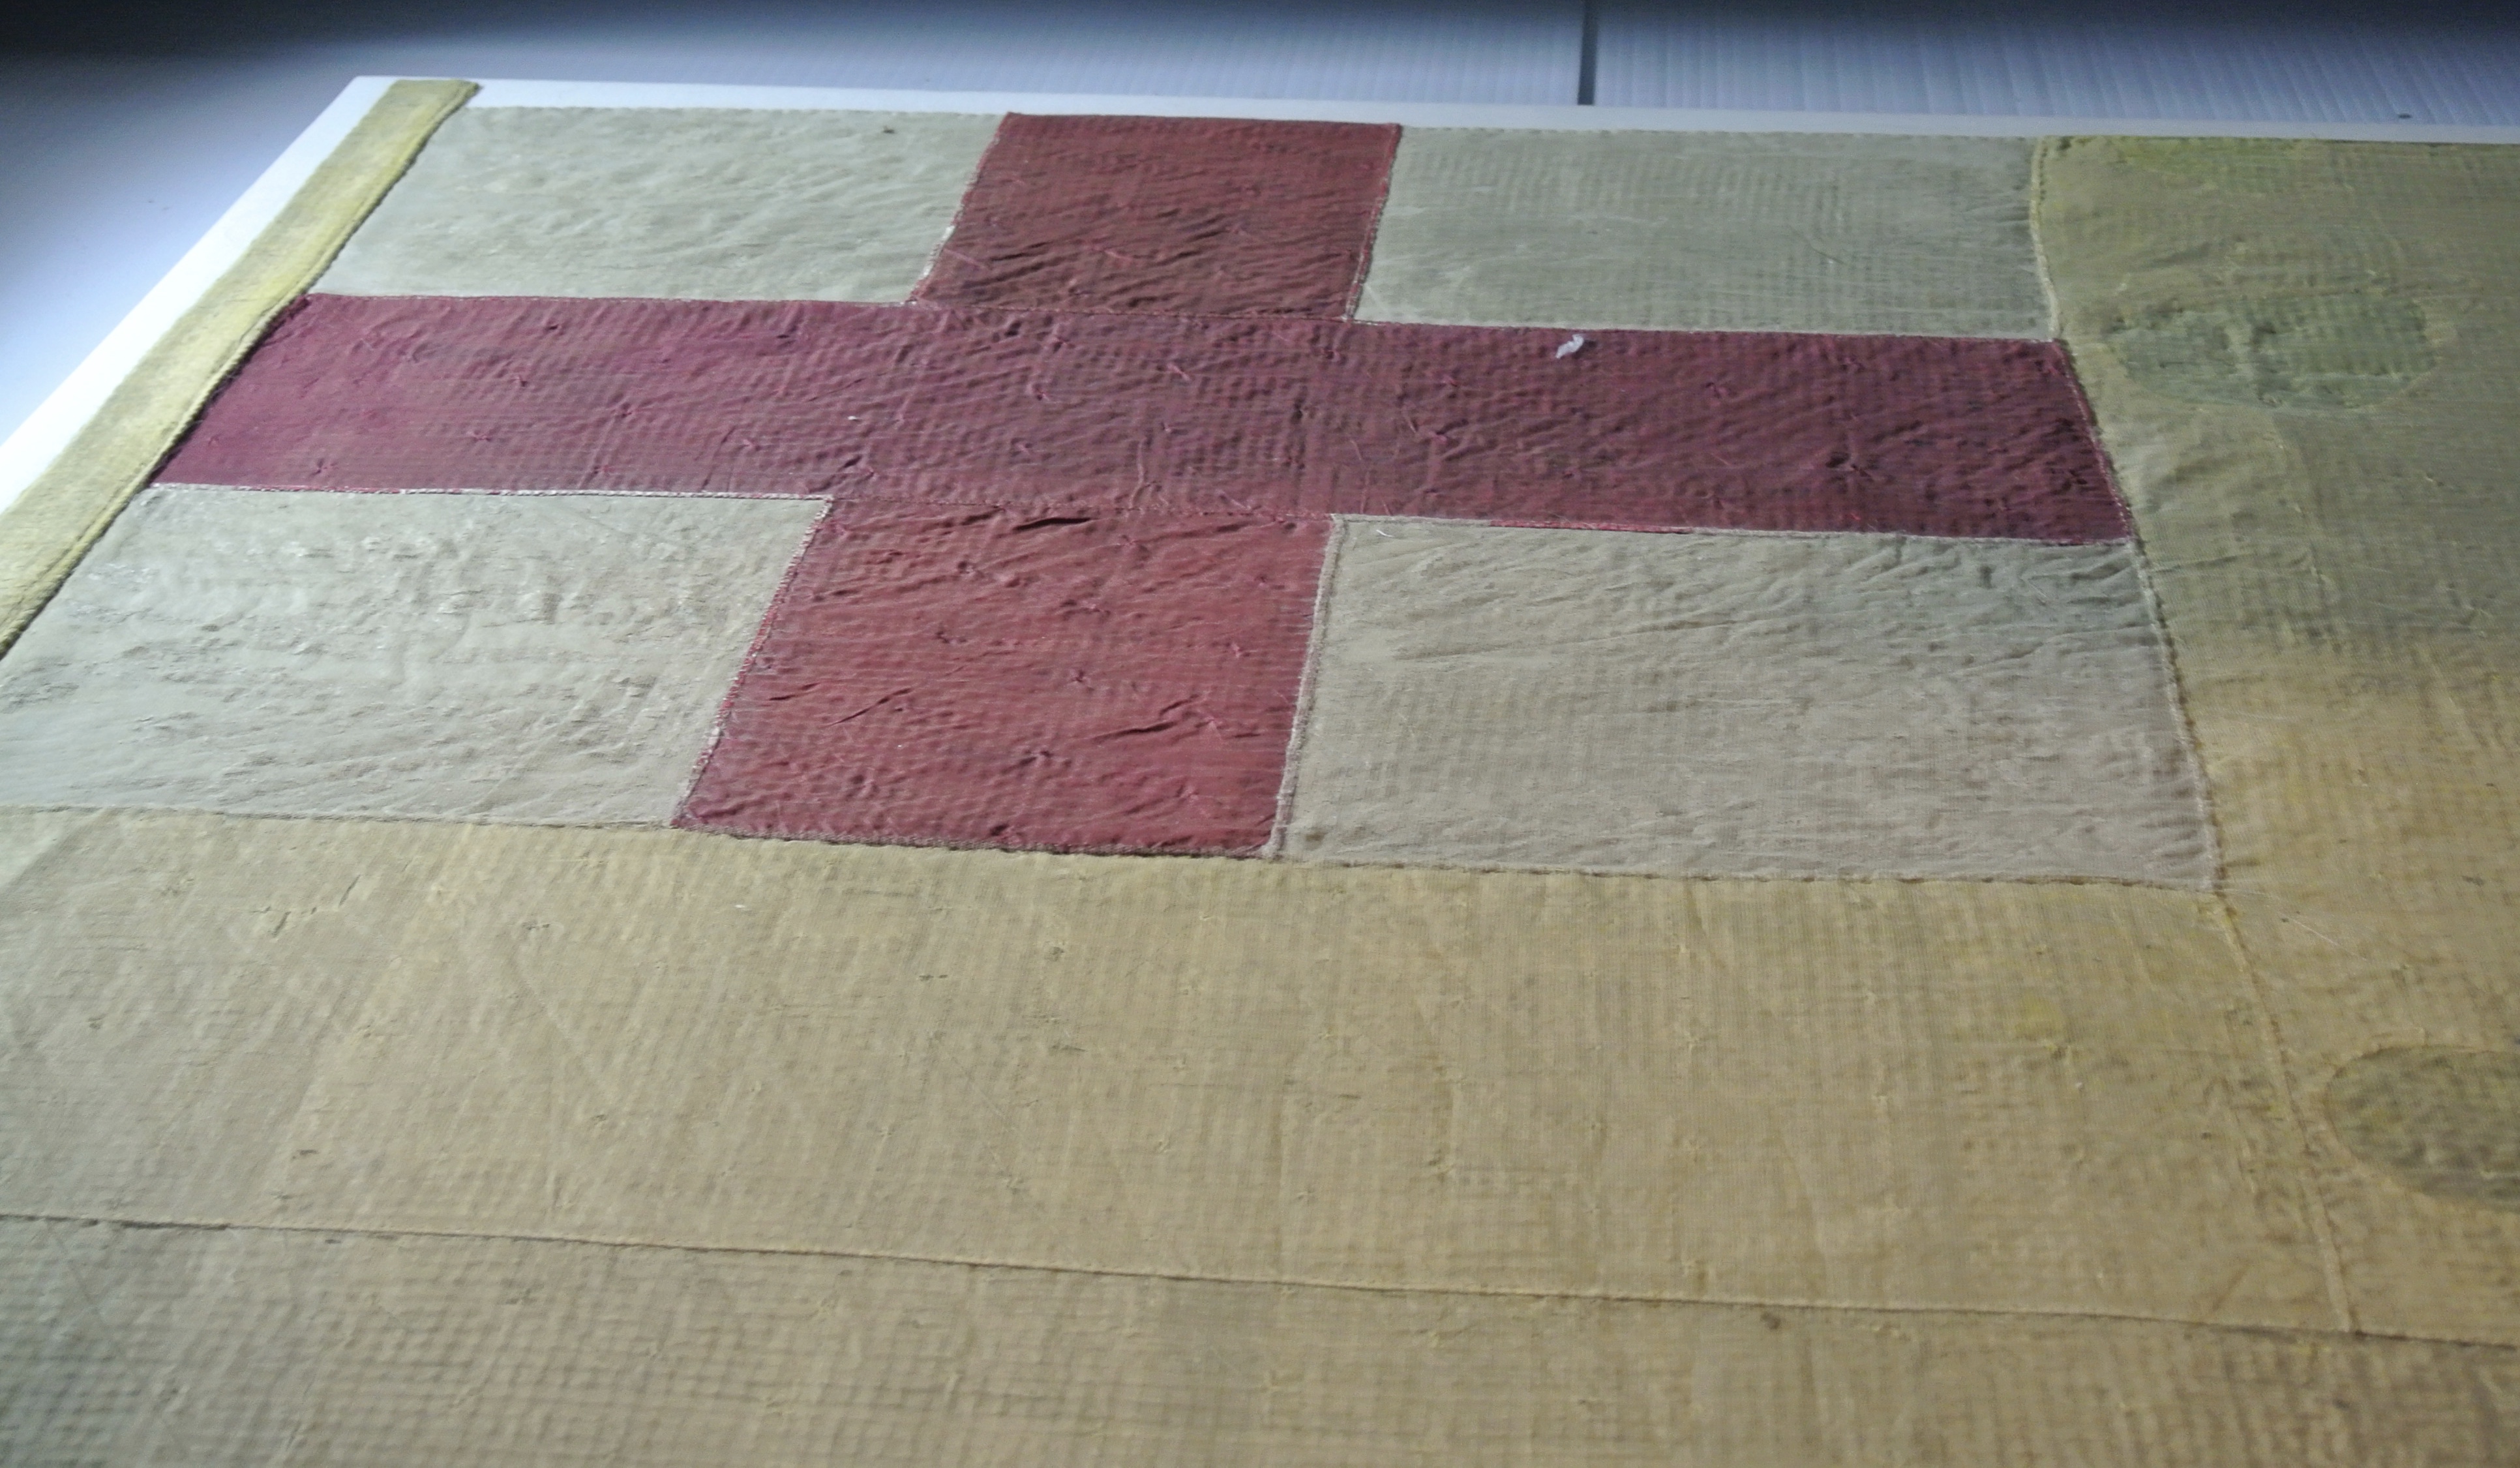
The silk on the St George’s canton, (especially the white quarters) has degraded over the years but it’s still possible to see how it went together. It’s obvious now, (though it wasn’t when framed) that the vertical of the St George’s cross isn’t one complete strip as the top and lower arms don’t quite line up. I think that I’ve now (having made a canton) worked out the sequence of construction for the St George in the corner. The canton was made up as a complete section and formed the basis for the rest of the colour. All the seams are run and fell to protect the cut edges of the silk, the practical problem here is that a run and fell seam has a finite width across both sides so if you aren’t careful lining up the pieces, the reverse side can look pretty rubbish (I found that out by trial and error). The two top vertical red pieces were sewn to a flanking cream square and the lower two were also sewn to another one, making sure that the two seams were identically aligned. Then these two sections were sewn to the horizontal red stripe to complete the cross.
The finished canton doesn’t overlay the flag, but is set into the body in the following way: It was sewn to the yellow silk section below it and this complete piece was sewn to the yellow top left hand quarter of the colour. The top and bottom halves were then joined by sewing together with another run and fell seam. In this way, all the seams are straight and there were no tricky corners to sew round. The entire flag was then hemmed on three sides with what looks like a thin cord inset within the hem to give it more body and hopefully keep it from immediately fraying in the wind.

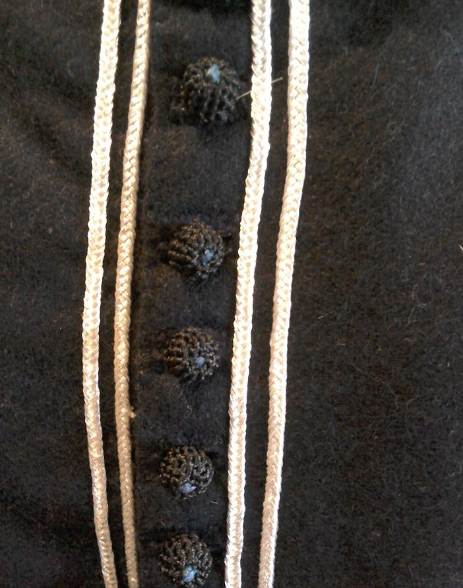
Following this, in a diagonal line from the corner of the canton were sewn a row of five blue stars. This denotes that the colour is the flag of a fourth (or possibly fifth) captain’s company. This also may explain why the flag has survived. Quite often any junior colours like this one wouldn’t have been used if the regiment was under strength. The stars are made of blue silk sewn into star shaped holes cut into the ground of the flag. I suspect the shapes were tacked on to the flag and whipped down around the edges before the silk was turned over and the yellow silk cut away. Then the yellow edges on the reverse were whipped over to hold them in place and to stop them fraying.
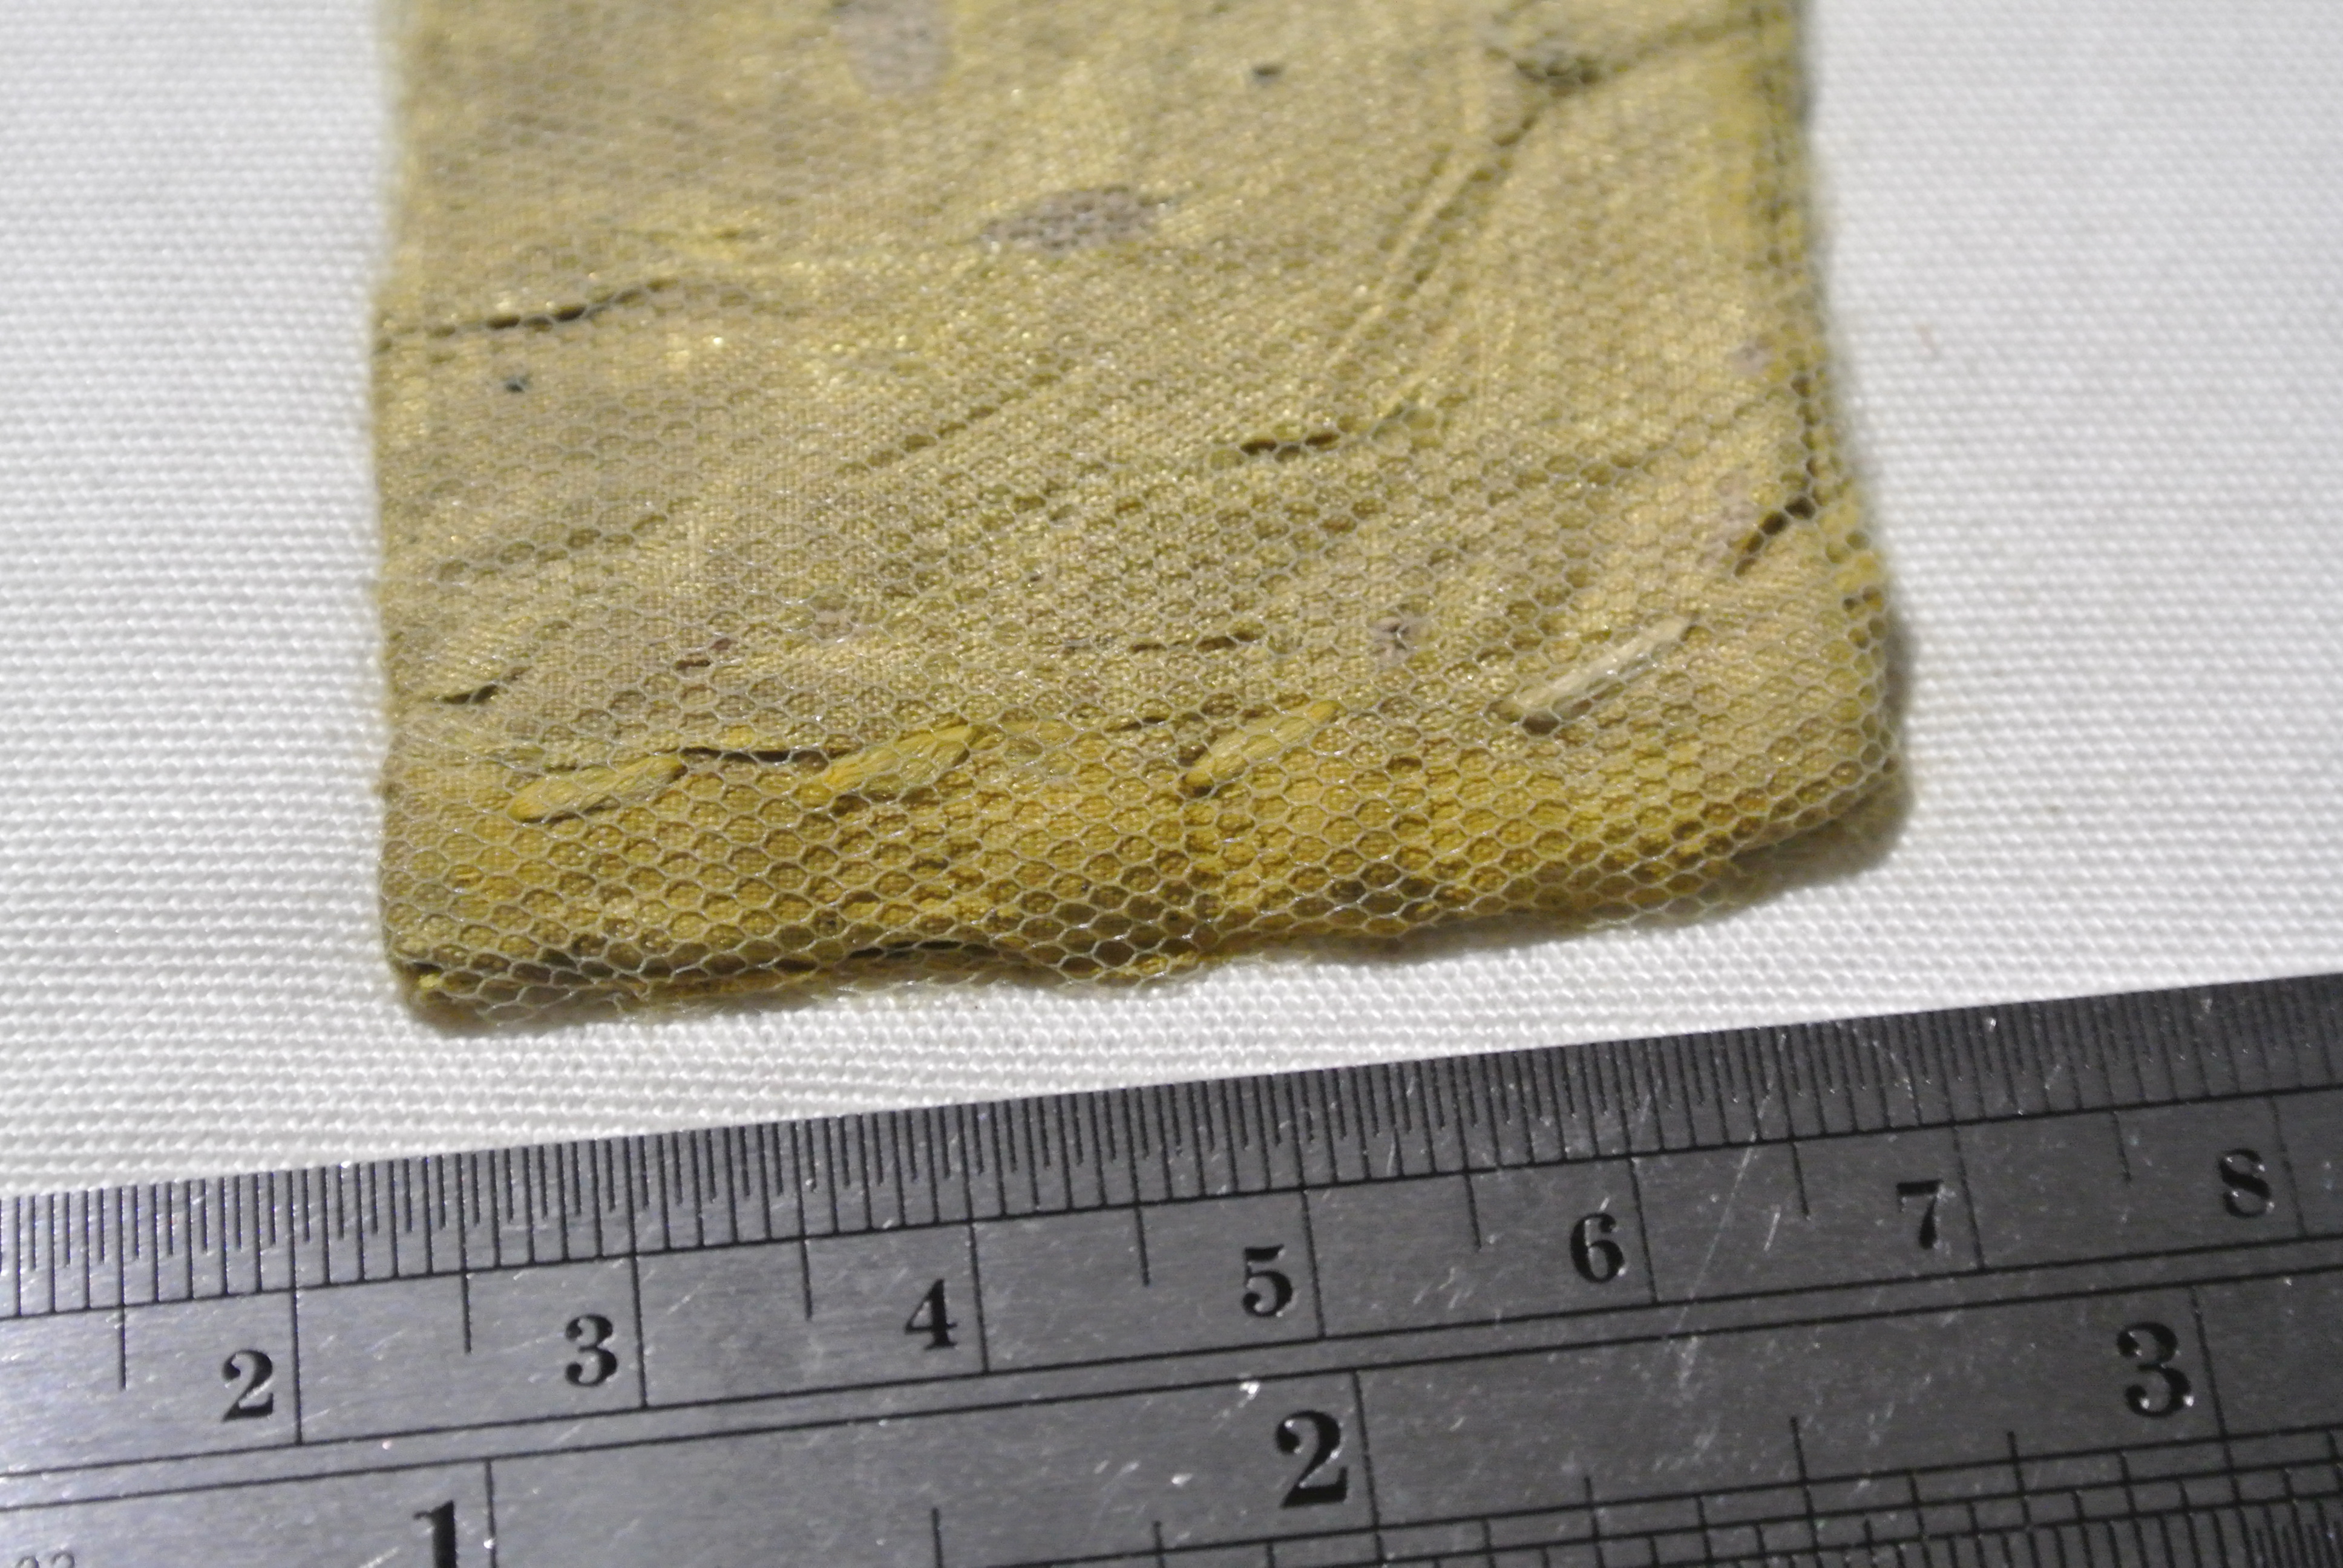
The pole sleeve was the made from the same yellow silk as the flag, lined with plain weave linen and attached to the colour. It’s 50mm wide at the widest point, and could take a pole roughly 3cm in diameter. The colour also had a matching silk cord with tassels attached. It has been associated with the flag for a long time so may be safely attributed, but it wasn’t available for me to view
The colour has been stabilized by the museum and covered with a fine net to prevent any further degradation of the silk. Some fine dust was removed with a fine sable brush and this brightened it up generally. The white silk, (and to a lesser extent the red) in the St George canton has degraded badly but this has been enclosed in conservation net and the whole colour now fixed to a padded board for future display. As I understand it is to be displayed at the Chelsea Museum in rotation with another flag a blue and white pile wavy foot colour, also possibly from the civil war.
Since I visited the museum I’ve been commissioned to make a gyrony colour, 2nd Captain’s company of Sir John Owen’s regiment, possibly Capt Brinknir’s company. This picture was what I had to use, but I could begin to see how it would go together.
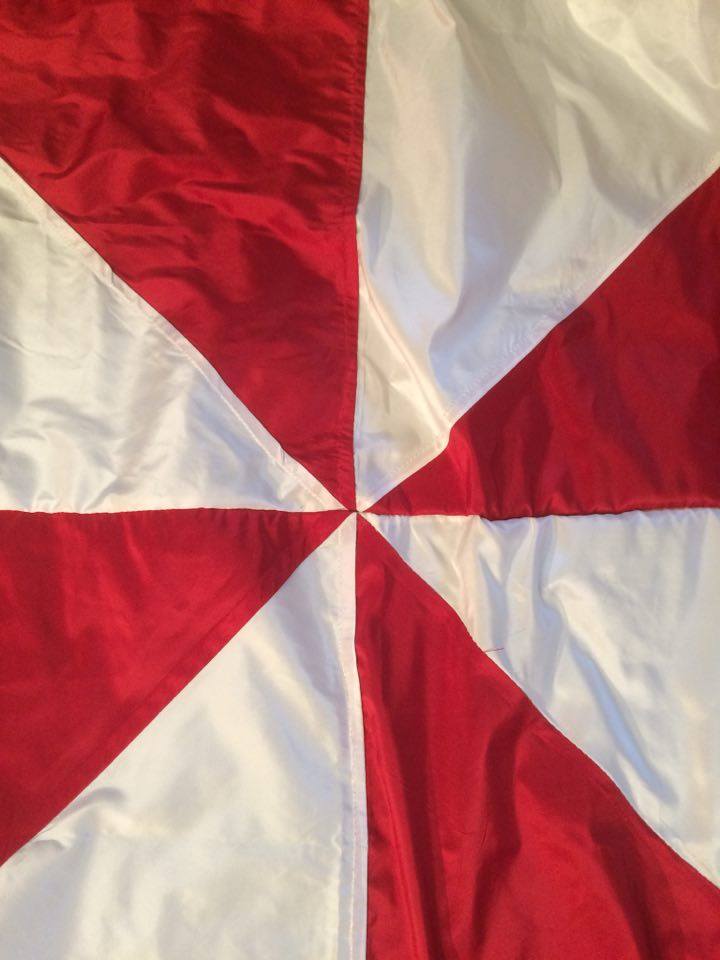
The canton in the corner I could do, having seen the Gell’s flag. The gyrony sections I thought would also be a doddle. How wrong could I be? It all started off well, that canton went nicely, it even lined up on both sides. and I managed to complex seam with the angle that joins the canton with the red section below it to the white silk piece that completes one quarter.
I laid out the silk pieces just to check all was well and took a deep breath before I carried on.

Then I hit the wall! Having made up the three other quarters I started to join the whole thing together and realised that the offset nature of the run and fell seams make it really tricky to align both sides of the flag. One side was quite respectable but the other….Suffice to say I didn’t take any photos! Notice here that the colour takes up most of the living room when laid out.
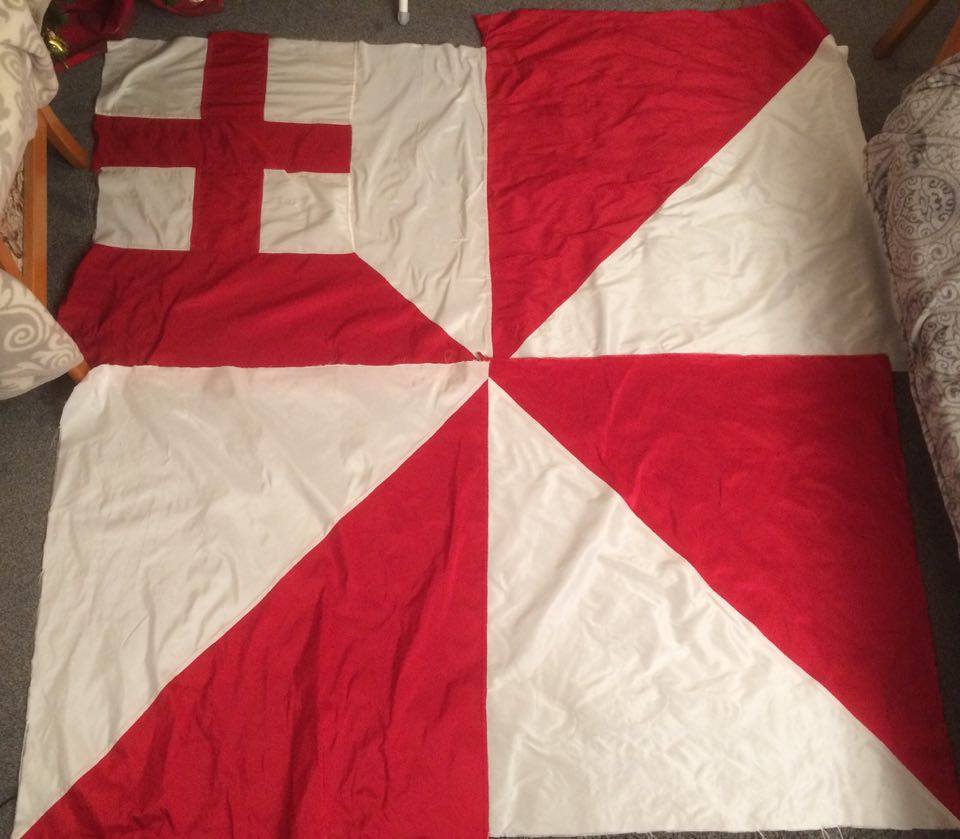
The drawing board was needed! I took a week off, then made a small replica and played with various alignments of seam, red over white, white over red etc. Why hadn’t I done this earlier! It was now coming together. If you are really interested I can draw you a picture of the seams and how they align, but to cut a long story short I was beaming all over my stupid face when I got to this stage. So glad it was only a 2nd captain’s flag that was ordered, but maybe I’d be up to the challenge of more sections?
It just needed hemming around some thicker interior thread, like the Gell’s colour and a pole sleeve adding. I had even sourced a silk cord and tassel to match the one in the illustration.

So here is the finished article ready to rumble.

More reading, (though with less accurate descriptions of this colour) can be found in:
English Civil War Flags and Colours by Les Prince & Stuart Peachey 1991
Ensignes of the English Civil War by Stephen Ede-Borrett 1997


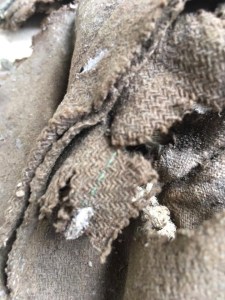
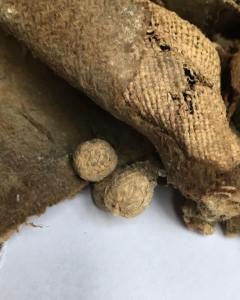
 In 1994 a bundle of rags was found beneath the attic floorboards of a house in Abingdon. The house is believed to date back to at least the 15th century and has a wealth of historical detail which Rachel, the current tenant was pleased to show me when I visited in June this year. The rags turned out to be what was left of a doublet of a 17th century style and something which on close inspection reveals a wealth of detail of a rare example of a common piece of clothing from our period. Janet Arnold reportedly dated the doublet between 1625 and 1630 when she looked at it and it’s hard to disagree, the sloping waistband would seem to suggest pre 1640 but the waistband and metal eyes post c.1620.
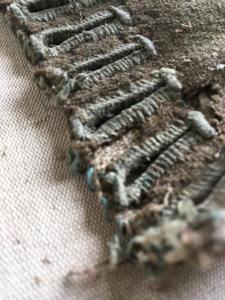 Luckily when I called we were able to remove the perspex cover over the doublet and the north facing picture window enabled me to take some detail shots with my phone. Looking at the doublet as a whole it is obvious that it was made for a small person, possibly (as has been suggested) a 5 or 6 year old boy who had just been breeched and that this was his very first doublet. What is left is 37 cm across and 38 cm long. All that remains is the left front, part of the left sleeve and fragments of the collar. The whole thing is in a very fragile state and it is still heavily soiled from being hidden. It was made from 2:2 twill woven wool and an initial analysis when the doublet was conserved found the presence of the compound indigotin. This indicates that it was originally blue and has faded to brown over the centuries. The buttonholes and some of the visible construction threads still retain a faint blue colour that reinforces the theory.


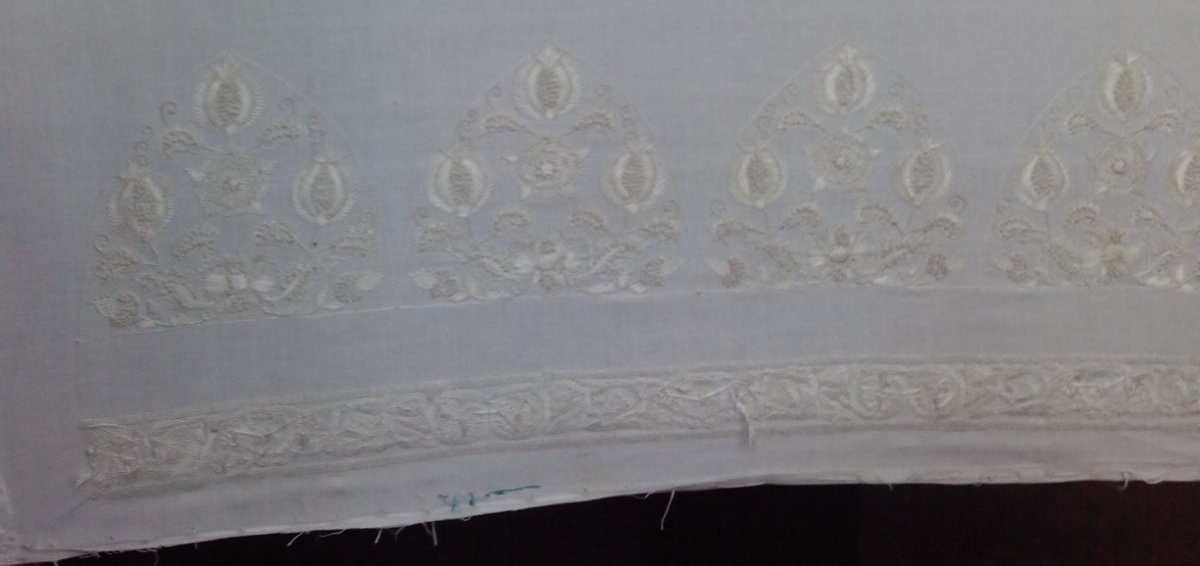
 I’m so pleased with the way this cap turned out that I may keep it for myself, though I would reluctantly let it go to a good home and a 60cm head! The embroidery was performed at Araaish Designs in Mumbai following a pattern that I sent to them together with a piece of antique linen and a skein of silk from Mulberry Dyer.